
Mastering Time Trials: Optimising Your Time Trial Bike
Mastering Time Trials
In the world of time trials, optimizing your time trial bike setup can help you go faster on the bike..
From bike position to the drive chain, each component plays a role in shaving off those precious seconds.
Let's delve into the some of the key aspects that can elevate your time trial performance.
Bike Position: Riding the Aerodynamic Wave
Your bike position contributes up to 85% of the drag on the bike, making it a pivotal factor.
Tilted bars with a bit of extra reach, approximately 15 degrees, are the latest trend for optimal aerodynamics.
Investing in a professional bike fit is the first step toward finding the sweet spot for your position.
Wheelsets: Finding the Perfect Balance
Deeper wheels generally mean greater speed, but consider race day conditions. Lighter riders will struggle in windy conditions with deeper section wheels.
Subtle differences exist between wheel brands, so research thoroughly before splurging on expensive upgrades.
Analyse the cost-benefit of upgrading wheelsets and explore alternatives to maximise your investment.
Tyres: Balancing Speed and Puncture Protection
Choose tyres based on performance gains and puncture resistance. Sites like Bicycle Rolling Resistance can guide your decision.
This article can show you how tire choices can impact race day performance. https://www.connecttoperform.ie/post/is-your-tire-choice-slowing-you-down
Recognize the trade-off between speed and puncture protection to minimise nervous energy on race day, see table below.
Explore tubeless, Latex, TPU, and Butyl tube options, considering your confidence in maintenance and rolling resistance.
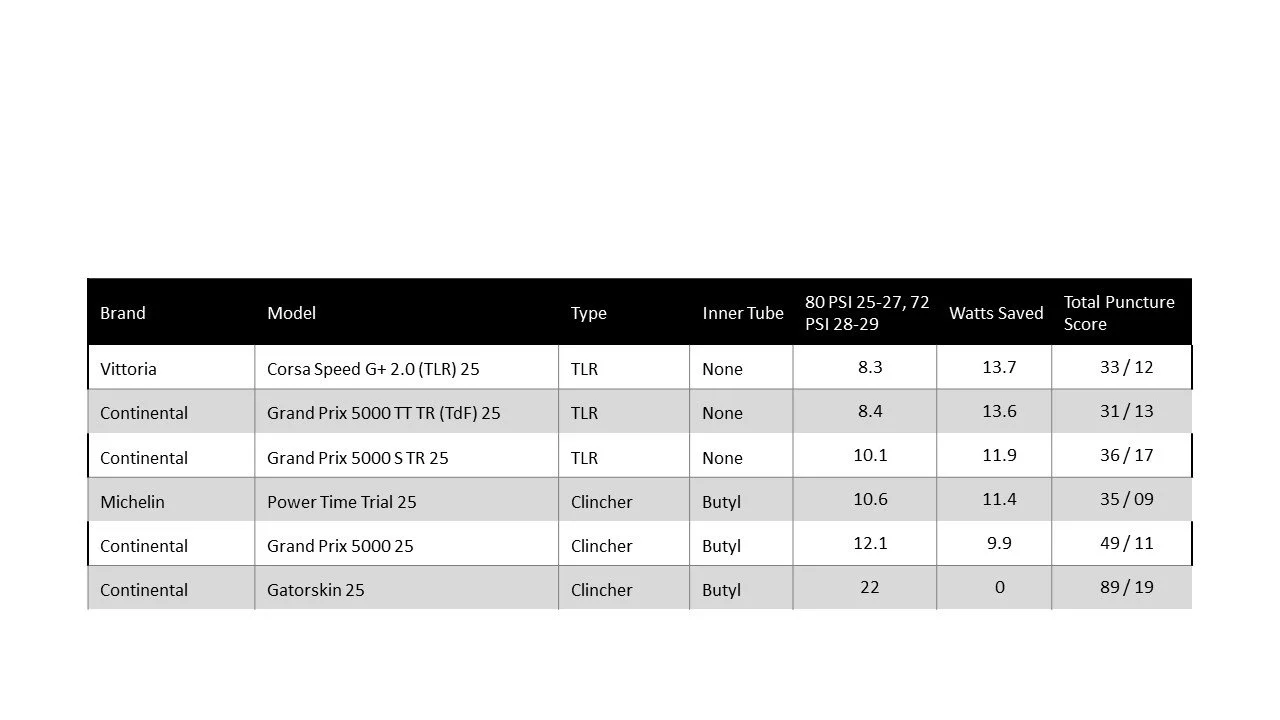
[Source: https://www.bicyclerollingresistance.com/road-bike-reviews] (Note: TLR/TR/TLE denotes tubeless tires; others use butyl tubes.)
Clothing: Sleek and Streamlined
Advances in triathlon clothing have led to faster suits, with sleeves generally outperforming sleeveless options.
Ensure a tight-fitting suit to eliminate wind resistance, and consider aero calf sleeves for additional savings.
Helmets: Cutting Through the Air
Aero helmets typically outpace road helmets, but the right fit is crucial. Look for width at the front and proper tail positioning.
Save 9 to 12 watts with the correct aero helmet, but consider ventilation in hotter climates.
Bottle Positions: Hydration with Speed
Experiment with bottle placements, noting the growing trend of tucking bottles down tri suits for optimal speed.
Proper placement on the frame matters; Aero Coach's tests reveal significant time savings with aero bottles.

source: https://www.aero-coach.co.uk/water-bottle-testing
Drive Chain: The Silent Force
A clean, waxed chain improves efficiency and reduces wear on the chain and cassette.
Despite the time investment, a waxed chain enhances overall performance and extends the lifespan of your equipment.
If we evaluate the cost effectiveness of each equipment choice we can compare the watts saved.
The table below shows just that.
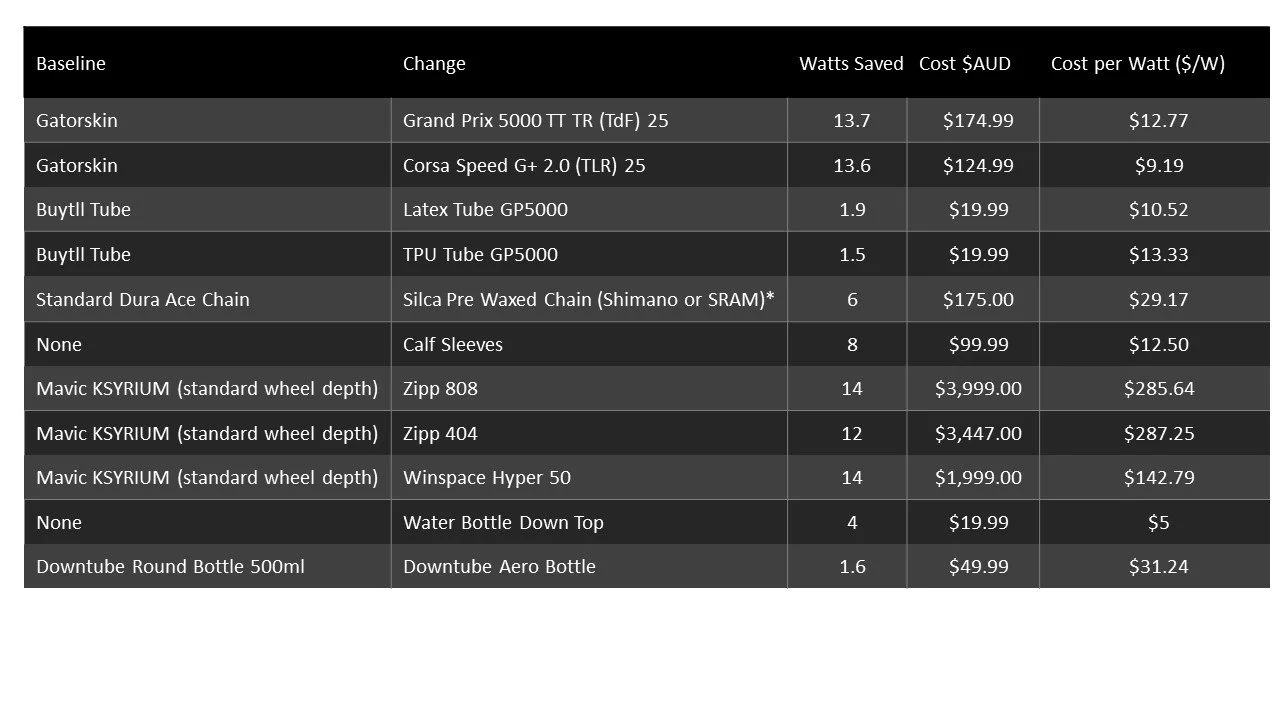
Here's a brief summary of the key points:
Wheels and Tyres:
Savings: 12 to 14 watts
Cost per Watt: Tyres have a lower cost per watt compared to wheel upgrades.
Recommendation: If you have a good wheelset, prioritise tyre choice for cost-effective watt savings.
This is an attempt to provide insight into the efficiency of each product.
It emphasises the importance of considering not only the absolute watt savings but also the cost-effectiveness of each upgrade option.
Mastering the art of time trials warrants attention to every detail.
By optimising your bike position, wheelsets, tyres, clothing, helmet, bottle positions, and drive chain, you can unlock the full potential of your time trial performance.
Invest wisely, experiment purposefully, and watch as seconds drop off your bike splits.

Zone 2 Training: What's the Big Deal?
Nearly all athletes training towards a specific goal follow some form of structured training.
Training is spread out using easy and hard sessions. The intensity of these sessions tends to be prescribed using training zones.
Everyone loves a good hard training session. You know the sessions when your lungs are bursting, and legs are screaming stop.
But the most important interval that we fall down on is our Zone 2 interval.
Why? It can feel too easy and that means we didn’t do any work right? Wrong.
The purpose of training zones is to elicit a specific physiological and metabolic adaption.
Spending time in any training zone elicits these adaptions by varying intensity. We use different training zones to target a desired adaption in training.
Let us peak behind training zones and get a basic understanding of what is happening:
At the cellular level: how cells transform energy (Bioenergetics)
Muscle metabolism: energy production to support muscle contractions
Cellular Level
Your ability to exercise ultimately is determined by how your cells transform energy into mechanical energy.
Your cells create Adenosine Triphosphate (ATP) which generates energy in the cell.
During exercise muscles contract to produce power (e.g. quads pushing big gears). Muscle contraction needs ATP to be produced and transported to your muscles. ATP is therefore produced constantly during exercise.
ATP production is achieved by two mechanisms – anaerobic and aerobic metabolism. Carbohydrates and fats are primarily used with a small contribution from protein to create ATP.
Our bodies store carbs and fats differently. Fat is stored mainly in the adipose tissues but is also stored in small amounts in muscles. Carbohydrate is stored as glycogen in muscle and liver. Approx. 80% of all glycogen is stored in the muscle and approx. 10 to 15% in the liver.
Why is this important?
Exercise intensity and muscle fibre recruitment dictates the energy system (Anaerobic or Aerobic) and substrate (Fats or Carbs) activated.
We use training zones to help target different energy systems and corresponding substrate utilisations.
At most exercise intensities ATP is generated through aerobic metabolism. At easy to moderate efforts, Zones 1,2 & 3 (see below), energy comes from a combination of fat and carbohydrates. Most of the energy comes from fat in Zone 1 & 2 and as intensity increases more and more carbohydrate is used along with fat (Zone 3).
At higher intensities ATP generation needs to be quicker to maintain demands of exercise (Zones 4,5 & above).
Fat metabolism is too slow and carbohydrate utilisation increases becoming the predominant source of fuel.
At these higher intensities ATP cannot be generated quickly enough by aerobic metabolism. The anaerobic system provides the energy demanded.
At the Muscular Level
Skeletal Muscle is composed of 2 muscle fibre types.
Type I: slow twitch
Type II: fast twitch
Type IIa
Type IIb
Muscle fibres are recruited in sequence. Type I are recruited first. As exercise intensity increases so does the demand placed on muscle contraction.
Type I fibres cannot support the demand at the higher intensities. As intensity increases Type IIa begin to kick in and eventually Type IIb will be recruited.
Type I muscle fibres are very efficient at utilizing fat for energy.
Type IIa fibres have a higher capacity to use carbohydrate in the form of glucose.
Type IIb have a very high capacity to use glucose and ATP stored for anaerobic energy.
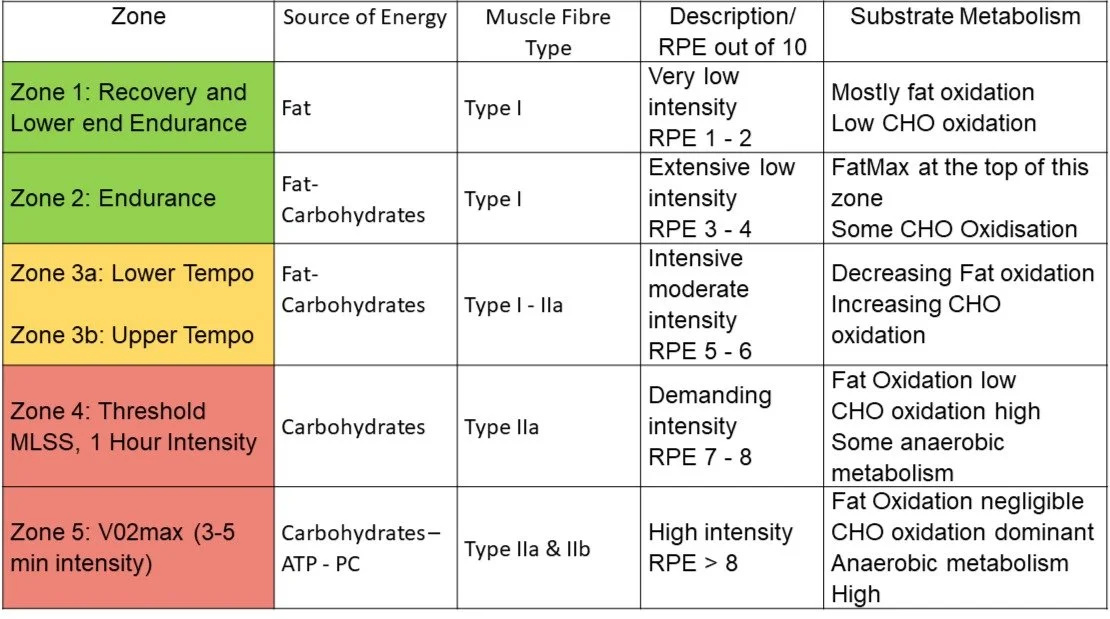
Exercise intensity implies different metabolic responses and muscle fibre recruitment patterns. These correspond to training zones shown in the table below:
Table 1: Training Zones/Associated Substrates/Muscle Fibre Types
So why is training in Zone 2 so important?
It simulates Type I muscle fibres. This increases mitochondrial growth and function, also known as mitochondrial density. Increasing mitochondrial density improves your ability to utilise fat. For endurance events this is a key performance enhancer. The more fat you can utilise preserves your glycogen stores for later in the event.
Type I muscle fibres also clear lactate. Lactate is a by product of the breakdown of glucose used during high intensity efforts. When intensity eases lactate is shuttled into the aerobic system to be cleared. Lactate is used by the mitochondria as energy as it is cleared.
By now you should see the value of Zone 2 training. It helps improve:
· Fat utilisation
· Spares glycogen for when it is needed
· Increases the clearance of lactate

What is the Aerobic Threshold?
The Aerobic Threshold (AeT) is an important ceiling for endurance athletes. It marks the uppermost exercise limit before when energy is dominated by the anaerobic system (glycogen/carbs/sugars).
The Aerobic Threshold (AeT) is an important ceiling for endurance athletes. It marks the uppermost exercise limit before when energy is dominated by the anaerobic system (glycogen/carbs/sugars).
The aerobic threshold is usually set at the top of Zone 2. It is also referred to as LT1/VT1. LT1/VT1 is the first lactate/ventilatory turn point where lactate rises above baseline levels. Lactate acid is produced as exercise intensity increases and carbohydrate combustion increases. The harder you exercise the more carbohydrate you use to fuel your effort.
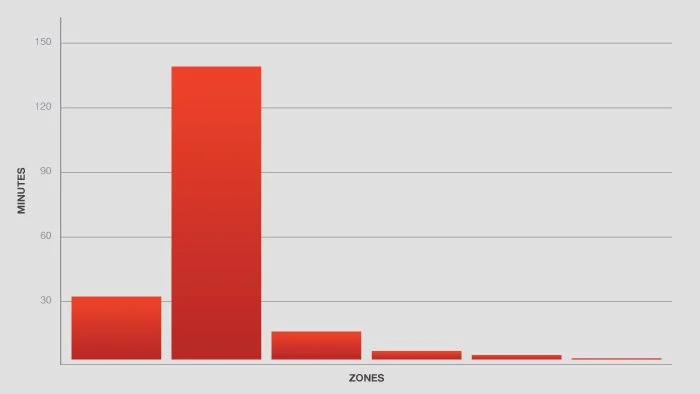
The figure below shows where the Aerobic Threshold sits in relation to a 6 zone model.

The AeT sits right at the top of Zone 2. When training at this intensity energy is mainly provided through fat metabolism with smaller contribution coming from carbohydrates. AS intensity of exercise increases so does carbohydrate metabolism shown below. Note this is an example of an athlete after an INSCYD metabolic test. Fat and Carbohyrate metablism is unique and individual, the results presented below may be different for you.

The main benefits to training below AeT and in particular in Zone 2 are:
You burn fat
You are primarily using Type 1 slow twitch muscles. These fibres mostly fuel themselves with stored fat
You build more mitochondria
The majority of your muscle energy comes from the mitochondria
Devoting time to Zone 2 training will stimulate mitochondria growth and help you become a better fat burner
Better fat burning means glycogen sparing
You become more metabolically flexible
A big base enables you to be switch between fuel sources (fats and carbs) at different intensities
Clear lactate faster
Lactate is a by product of the breakdown of carbohydrate during exercise
It is produced at higher rates as intensity increases
Lactate is used as a fuel source in other cells
Lactate is cleared out of fast twitch muscle fibres into the slow twitch muscle fibres by a process known as mitochondrial lactate oxidation
Once in the slow twitch muscle fibres lactate is re-sued as energy
Building a big aerobic base and training in Zone 2 has many advantages. Over the last number of years the ‘no pain, no gain’ mantra has been popular. If exercise intensity is not hard then you are not training hard enough. It can be common in athletes who may have highly fine tuned top end anaerobic capacities but underdeveloped aerobic capacity/base.
This is known as Aerobic Deficiency Syndrome (ADS), first coined by Dr. Phil Maffatone in the 1980s
But what is ADS?
Don’t be alarmed it is not some life threatening condition. ADS is the result of a poorly functioning aerobic system.
For short events such as 5K, 10K and all the way up to half marathon you run these events close to or at your Anaerobic Threshold. The pace you can hold at your Anaerobic Threshold is key for these events. If you try to push above this threshold you will blow up.
Similarly, if you extend out the duration of your event to 3+ hours (marathon, Ironman or 70.3) then your Aerobic Threshold is critical for performance. For long distance events your Aerobic Threshold is a key determinant of success. If you push above the Aerobic Threshold for these events you run the risk of hitting the wall.
Athletes who have a well developed aerobic system have an aerobic threshold pretty close to their anaerobic threshold, within 10%. It is one of the reasons the elite athletes can put out those super quick times. The figure below gives an example of an athlete with a well developed aerobic threshold. Their aerobic threshold is within 10% of their anaerobic threshold.
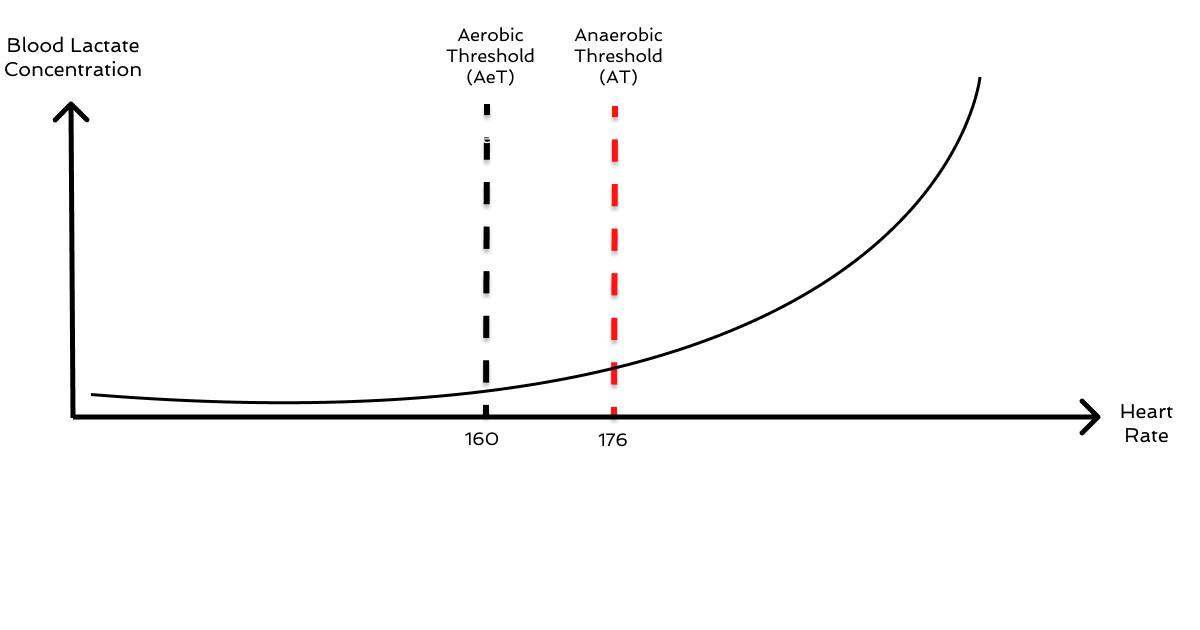
An athlete with ADS will have a very different profile shown below.

This athlete may feel fit and strong and be able to push through to high numbers for short durations. But for an event lasting more than 3+ hours the athlete will be forced to slow down, if they spend a lot of time above their Aerobic Threshold.
They most likely fall into the trap of training moderately hard all the time.
The Aerobic Threshold can be trained and improved. Moving the Aerobic Threshold or raising the aerobic ceiling closer to the Anaerobic Threshold should be the goal for every endurance athlete.
This will involve Zone 2 training and avoiding Zone 3 or moderate intensity. Be patient and build your aerobic base, then add intensity.
You will reap the benefits of all the advantages of having a high Aerobic Threshold mention above.
If you would like to determine you AeT and Fat and Carbohydrate combustion rates book for INSCYD test today